Author: Luca Giupponi
Contributors: Amanda Lanier, Shannon Spasova, Daniel Trego
There are a number of strategies you can use to demonstrate handwriting techniques online as well as give feedback on and evaluate student work. These strategies can also work well for other tasks such as diagramming. Choosing the best strategy for you will depend on your specific goals as well as what tools are available to you. In this blog post, we will discuss synchronous and asynchronous strategies separately, although there is definitely a lot of overlap between the two.
Synchronously
Joining a Zoom meeting with additional devices
The easiest way to use a “writing board” in a live Zoom meeting is to join the meeting with an additional device, such as a smartphone or tablet, and sharing the Zoom whiteboard from that device. Watch this short video for a walkthrough of how to set this up:
You can use the same method to annotate a slide or anything else you load on your screen with the Zoom annotation feature.
We recommend using a stylus to write on your device. You can find very inexpensive styluses online, such as this one ($14 for two): MEKO Universal Stylus.
Diagramming: If you do not have access to a tablet, Diagrams (free) is a great web-based option that you can use to produce diagrams/flowcharts in real-time. You can use it with your class by sharing your screen. Our recommendation is to try and build as much of the diagram as possible before class. It is a lot easier to manipulate portions of demonstrations than to create them from scratch during a presentation.
You can also generate complete diagrams before class by using tools such as RSyntaxTree, jsSyntaxTree, or synTree (all are free). Once a diagram is generated, you can put it into a presentation and use the Zoom Annotation feature to draw your students’ attention to a specific part of the diagram.
Using a document camera
If you want to demonstrate handwriting or diagram using pen and paper, you can set up an external webcam or a phone to function as a document camera. This can be done either for free using items you can find around your house, or using an inexpensive dedicated setup. There are multiple ways to do this, and here are a few helpful resources to help you find the setup that works for you:
- A K-12 teacher using a selfie stick to set up a document camera
- Using your phone or a tablet as a document camera
- Squarecap: turn your phone into a document camera
- San Jose State: Replicate a document camera in a Zoom meeting
- A $12 phone stand you can use to set up your smartphone
Regardless of what setup you choose, you should be mindful of how lighting and glare affect your document. Position your document and camera in a way that makes the image as evenly lit as possible.
Mechanical Engineering Professor Allison Okamura (Stanford University) has shared the following best practices for using a smartphone as a document camera:
- Use a dark pen that writes clearly.
- Make sure you have a good light source in front of you, for your face and for the document. Avoid backlighting.
- If you write with your right hand, you will set up the paper to the right of the computer/keyboard. Left-handed users can set this up to the left instead. I recommend using unlined white paper.
- Set the camera up about one foot from the writing surface.
- It may be better to use the camera on the back of the phone, rather than the selfie camera, but you can see what works best for your setup.
- Make sure the smartphone is capturing video in the right orientation. How you do this depends on your phone. If there is a problem maintaining the correct orientation after laying the phone down, you can look for a phone-specific solution to lock the orientation. There does not seem to be a way to lock orientation on the mobile Zoom app, so this has to be done via settings in the phone’s operating system.
- Practice writing and drawing the types of equations and diagrams that you expect to use during your meetings.
- Remember that what you see on your computer Zoom window is what the other participants will see.
- In Zoom, others can “pin” the video from the phone feed to make this the video with the largest size in “speaker view.”
- The person drawing may want to use the “gallery view” to see both other participants and their phone feed clearly.
Connecting a device via Zoom
Zoom allows sharing from an iPhone or iPad using a cable or wirelessly (as long as it is connected to the same network). Duet will also allow another computer or a tablet to serve as an additional monitor, and then we can share screen from that “monitor.”
Asynchronously
Handwriting practice is arguably one of the easiest learning goals to shift to an asynchronous delivery mode, both in terms of demonstrating techniques and giving feedback to student work. Save your precious meeting time for student interaction and demonstrate handwriting techniques via pre-recorded videos.
Demonstrating Techniques
You can use the same setups recommended above for synchronous instruction such as a document camera or a tablet to simply record yourself as you demonstrate handwriting or draw diagrams. If you are using a document camera, the recording will take place on your computer, and you can use MSU video recording tools such as Camtasia, Snagit, Kaltura Capture, or Zoom for your recording. Multiple short videos are better than one long one. You can then upload your videos to Mediaspace and embed them in D2L or share the link with your students.
If you are using a tablet, you can still record the video on your computer using one of the setups explained above. You can also record the video directly in your tablet, as most tablets will allow you to record the screen of your device while you draw (but be mindful of storage space issues).
There are a number of additional tools you can choose from depending on your needs:
- ExplainEverything ($24.99/year for an individual instructor or $8.99/year/instructors for groups of 10 or more): records you while you draw and includes video editing tools directly inside the app. Learn more on how to use it for language teaching.
- Notability ($8.99 one-time purchase): powerful drawing and annotation features. Does not include a recording feature.
- DocHub (free account for up to 2000 documents): allows to draw on PDF documents, so this would be good for giving feedback on student work as well.
Giving Feedback on Student Work Using OneNote
OneNote is included in the Spartan 365 suite, so you and your students already have access to it. OneNote works like a virtual binder with multiple sections (like dividers in a binder) and individual pages in each section. You can choose to access OneNote through your browser, the desktop version, or the app on your device. Any of these will allow you to type into a page like you would in Word, but you can also copy and paste an image onto a page or attach a file to a page. We’re talking about how you can use it to teach handwriting, though, so the mobile app version may be particularly helpful. Create a new page and then click the camera to add an image to it. Choose from the options to add a photo, a document, or a whiteboard. The document and whiteboard options will automatically optimize the picture you take.
This is an incredibly helpful article written by a Hindi/Urdu instructor on how to use OneNote exactly for the purpose of teaching handwriting: Using OneNote to teach Hindi Online
If you request a Class Team, it automatically generates a OneNote with logical sections and useful note-taking spaces, not to mention built-in instructions. To create a team you need to go to apps.d2l.msu.edu/teams and request a team for each of your courses. Even if you do not plan to use Teams with your class, you still need to create the team in order to generate the class notebook. You don’t have to use the team at all or even tell your students there is one. To learn more about integrating Teams with D2L, please visit this help page.
Giving Feedback on Student Work Using D2L
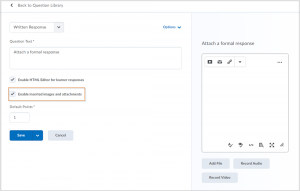
Students can submit their hand-written work in D2L. You can do this two ways: using an Assignment or a Quiz:
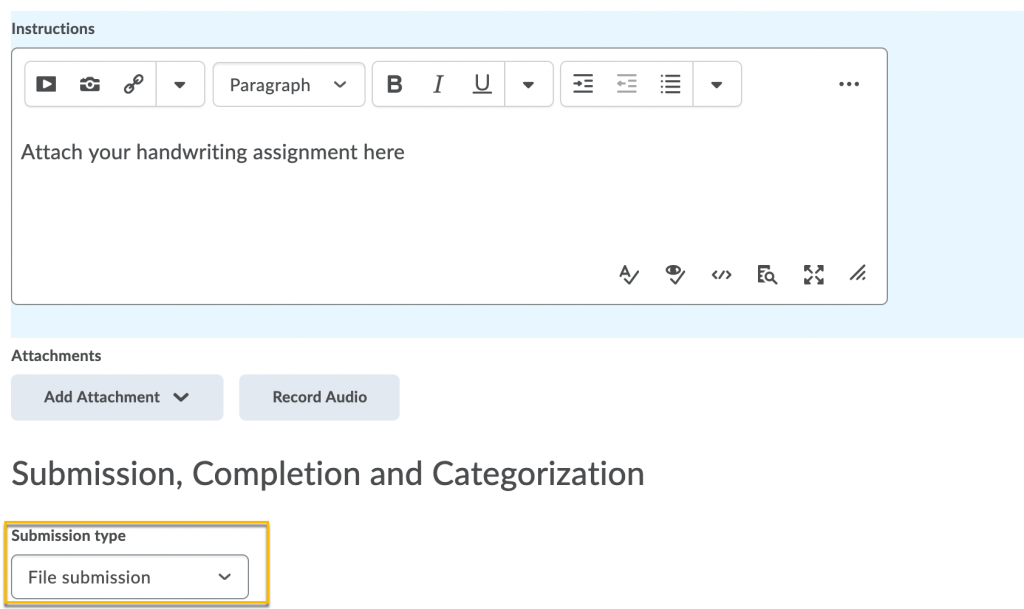
When capturing written work, we recommend using Office Lens (available with Spartan 365) to scan as PDF before saving and uploading a file to a quiz. This will greatly reduce the file size of the upload vs the student uploading an image from their camera phone.
Language-specific resources
Learners can use resources from the web including videos and apps to learn handwriting skills, which reduces the importance of an instructor demonstrating or requiring “in class” practice. Instructors have various options for holding learners accountable for practicing with these tools, from relaxing control over the amount of practice, to honor system submission of logs for use of the app, to screen recording videos submitted as assignments, to only looking at the completed documents and trusting that the learners did their own work.
Skritter helps students learn the order of strokes in Chinese and Japanese characters. Xiezi, Pleco and WrittenChinese are also helpful resources for learning Chinese script. YellowBridge and ArchChinese are websites that teachers and students can use to watch the demonstration of stroke-by-stroke writing of individual characters.
Do you really need to teach handwriting?
Depending on what level you teach, how much time you have, and your goals, you may want to decrease the emphasis on handwriting until later in the student’s language learning career. For example, have you already determined whether handwriting or typing skills will be more beneficial to your students? Given the limited amount of time you have with them, you may decide that in the long run you’d rather teach them to type than to write by hand. Shannon Spasova wrote an excellent article outlining the why and how to teach typing for non-roman languages: The Case for Teaching Typing.